Last Updated on August 28, 2022 by admin
Identifying the kind of system in place and the potential consequences of removing your well pump from the ground is an important first step. You’ll also need to be familiar with the wiring setup. You’ll be able to begin the process of having everything updated and connected correctly after that. 110 Volt Well Pump Wiring Diagram is the focus of this post.
Table Of Contents
Begin with the Breaker Panel
A wiring schematic should be printed inside the front door board of the primary breaker panel. Shut off your well pump by following the instructions in this article. Examine to verify whether the circuit breaker occupies two or just one spot. 220-volt system powers two areas, while 110 volts powers one. When purchasing a new pump, this is a critical consideration.
Examine the Voltage
Despite the breaker is turned off, verify the circuit using a voltmeter. To test whether the pump works, you may run the water and observe if it does. However, a meter is preferable.
The pressure switch, which is normally placed towards the bottom of your water tank and is connected to the water pipes, should be checked for electricity. You may remove the pump now that the switch has been checked for zero voltage on both sides.
Wiring Diagram for 110 Volt Well Pump
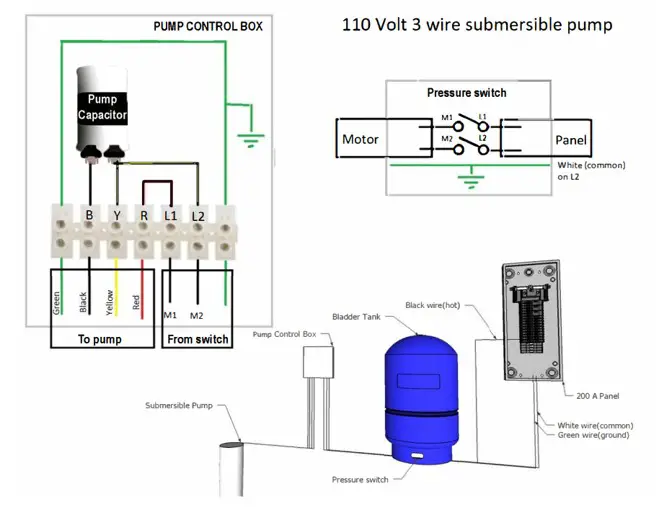
A three-wire pump may be replaced and reconnected:
- After performing the zero-voltage inspection, replace the pressure switch covering and proceed to the pump control panel farther downstream.
- Remove the lid and examine the contents. Y, R, B, L1, and L2 are the most often used designator markings, however they may have diminished with time. Take a photo with your mobile to remember which color wire fits where if the rest of the wiring and pump capacitor is obscured.
- Make that the new pump’s wires match up with the old ones before disconnecting them.
- Remove the green grounding from the pump terminal lugs using a screwdriver and remove the red, yellow, and black colored pump connector wires from the pump boxes.
- Pull the wires through the conduit using a sturdy, lightweight thread.
- In order to attach the new pump, use a piece of twine and your image.
Foreign three-wire pumps may come in a variety of wire colors, including black, blue, and brown, which are the most popular in the United States.
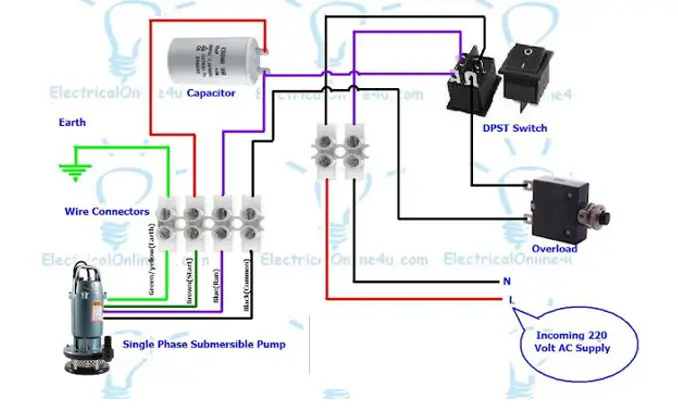
Single Phase Water Pump Wiring Diagram
A DPST switch, a resistible thermal overload, and a capacitor are used in the submersible pump control box. The connecting of the submersible pump control box wiring is extremely straightforward and quick. Step-by-step guidance is provided below.
- As a first step, turn off the primary circuit breaker on your distribution board so that you may operate in safety and avoid electric shocks.
- Next, attach the power source to the input wires.
- Here are the procedures to take, depending on whether or not your box is connected or unwired:
- If using wire connections, connect your neutral and line wiring to the double pole single throw switch as depicted below, and afterwards attach your hot wire/phase to the neutral wiring.
- Then grab a hot wire from the DPST switch and link it to the resettable thermal overload protector. To prevent damage to the output wire connection, the form overload protector links the black wires.
- Attach the switch’s neutral wire to the capacitor’s terminal, then from that exact terminal attach it to a connector on either of the outputs.
- Once you’ve done so, attach a wire from another end of the capacitor contact to one of the red or brown out-wire connections.
- Using the green color in the figure, link your ground or earth line to 1 number connection as shown in the illustration.
- You now have four output wire connections, each of which has a unique number: one for the earth connection, two for the beginning terminals, three for the running wire for the motor, and four for the general.
So, you’ll need to link the submersible pump’s running, starting, and common wires to the control box. Typically, the running wire is black, the starting wire is blue, and the common wire is brown or red. However, these colors can be altered or a distinct color wire may be used in your submersible pump.
Start by connecting the box connection to the pump’s three wires as indicated in the single-phase 3-wire submersible pump box wiring schematic below, assuming you are familiar with their locations.
FAQs
Why are there three wires on a well pump?
Answer- Despite the fact that this renders installation more energy consuming, it makes it far simpler and less expensive to repair and replace specific pieces rather than the complete motor in the event that anything goes wrong.
Is grounding required for well pumps?
Answer- It is advised that the ground wire of each and every motor used for a well pump be linked to the identical service ground as would be used for any other motor. The practice of grounding is important for public health and safety because it provides protection against electric shock and death by electrocution caused by leaking current.
Is there a need for a separate circuit for a well pump?
Answer- A water pump, much like the majority of other motor-driven home equipment such as a furnace or air compressor, uses a greater amount of electrical current when the pump motor first begins. This start-up current might demand practically all of the available capacity in an electrical circuit, and as a result, it needs its very own dedicated circuit in order to function properly.
Conclusion
There are several benefits to using a well pump to transport water, whether to your home or another location. A pressure tank system is used by well pumps, and this system is what transfers water from the reserve or reserve tank into the piping of your house. With the assistance of this article on the 110 Volt Well Pump Wiring Diagram, you will be able to learn how to wire a well pump if you already possess the necessary expertise.