Last Updated on January 2, 2023 by admin
The thermostatic mixing valve is a necessary component for the bathroom. It blends hot water with cold water and ensures the water’s final temperature is safe for human usage. You may also know this machine as TMV. Proper maintenance of this gadget is highly required to keep it usable for a long time.
To use and install it correctly, knowledge about how does a thermostatic mixing valve works is necessary. You should also know about all the parts of this thermostatic mixing valve. Hopefully, with proper maintenance, you will be able to use it for an extended period.

Table Of Contents
- 1 Main Components of a Thermostatic Mixing Valve
- 2 How Does a Thermostatic Mixing Valve Work – The Phase-Wise Processes
- 3 Thermostatic Mixing Valve Regulations
- 4 Thermostatic Mixing Valve Problems
- 5 Honeywell Mixing Valve Problems
- 6 What Causes Honeywell Mixing Valve Failure?
- 7 How Long Do Honeywell Mixing Valves Last?
- 8 How Do You Adjust a Honeywell Mixing Valve?
- 9 How Do You Clean a Honeywell Mixing Valve?
- 10 Final Words
Main Components of a Thermostatic Mixing Valve
A thermostatic mixing valve comes with many internal parts for blending hot water with cold water. There are a total of seven essential portions in a thermostatic mixing valve. Those seven crucial parts are:
- Hot water inlet port
- Cold-water inlet port
- Thermostat element
- Slide valve
- Hot valve seat
- Cold valve seat
- Mixed water outlet
How Does a Thermostatic Mixing Valve Work – The Phase-Wise Processes
Those seven parts above take full responsibility for blending hot and cold water. This whole process makes sure the water you will use to shower comes at a suitable temperature. The phase-wise working processes of this machine are:
Phase-1: Water Supply
There are two ports available on both sides of the thermostatic mixing valve for the water supply. Those two ports are known as the hot water inlet port and the cold water inlet port. As their names suggest, they are for supplying hot and cold water respectively.
The hot water port will be connected to the water heater. On the other hand, a cold water port needs a connection with a regular water supply.
Phase-2: Internal Connection
There will be a slide valve in the middle of the thermostatic mixing valve. When water comes through the inlet ports, water has to go through this part. The hot valve seat will connect the hot water inlet port with the small hole of the slide valve.
It will be on the lower part of the slide valve, also known as the piston. On the other hand, the cold valve seat will connect the cold-water inlet port with the other hole. It will be on the upper portion of the piston. Both these holes will take water at the blending section.
Phase-3: Water Blending
A thermostat element will be present at the piston as the heat sensor. The water will constantly flow through the hot-water inlet port and the cold-water inlet port. Then, water will try to flow below the blending part through both valve seats. But the sensor will control the water flow of both these sides.
When the sensor feels the necessity of hot water, it will shut the cold-water valve seat. So, only the hot water will flow to the blending part. Similarly, when there is a necessity for cold water, the piston will shut the hot valve seat. This action will let the cold water flow down.
The required hot and cold water will continue to flow in that part, and they will mix. The blended water temperature will be suitable because of the heat sensor situated above.
Phase-4: Supplying Blended water through the mixed water outlet
All the parts in the thermostatic mixing valves will make sure the suitable temperature of the water. Then that water will flow to the shower pipe for your usage. And hopefully, you will get the perfectly blended water at your suitable temperature.
Thermostatic Mixing Valve Regulations
The necessary regulations to follow are:
- Depending on the appliance, the blended water temperature should remain within 38-45-degree Celsius
- Field-testing is highly required in every 12-month cycle to keep the machine efficient
- The pressure in the thermostatic mixing valve should stay within 0.2 bar to 10 bar
Thermostatic Mixing Valve Problems
The problems that you may need to face while using a thermostatic mixing valve are:
- The water temperature may not be suitable per your requirement
- Water flow in any section can face interruption
- The thermostatic mixing valve pipes can get leaked or drip as well.
Honeywell Mixing Valve Problems
A mixing valve is a device that combines cold and hot water and provides you with a temperature-controlled flow of water before it reaches faucets.
Honeywell is one of the most popular companies that offer both mechanical and motorized mixing valves that you can use in your house.
Let’s discuss some of the most common problems that you can experience using a Honeywell mixing valve.
What Causes Honeywell Mixing Valve Failure?
Here are some of the main common problems with Honeywell mixing valves that can lead to a mixing valve failure.
Faulty Product
It’s possible to receive a faulty product that will not work as intended. Reports are suggesting reports suggesting that customers received faulty Honeywell mixing valves and they had to get the defective product replaced multiple times.
If you have bought a new Honeywell mixing valve and it isn’t working properly, you might also have received a defective unit. In such a case, you’ll need to get it replaced.
Normal Wear and Tear
Just like any other product, the mixing valves that Honeywell offers also have a certain lifespan. Over time they can get damaged due to normal wear and tear.
The deterioration of mixing valves takes place due to minerals present in water, which leads to corrosion and limescale buildup. In this case, you’ll need a new mixing valve to solve the problem.
Poor Installation
While it’s not a problem related to Honeywell products, it’s one of the common causes that leads to a Honeywell mixing valve failure. If your mixing valve isn’t perfectly aligned it’ll fail to turn completely. As a result, the hot or cold side will have a narrow passage to let the water run freely.
It can also lead to dripping taps or faucets, wasting tons of water, which simply means money going down the drain. In addition, if you’re receiving hot water from the cold side and vice versa, it means that the mixing valve is reversed 180 degrees.
Burned Out Motor
If you have a motorized Honeywell mixing valve, you can end up with a burnt-out motor. These motors run throughout the day, can get very hot, and may eventually fail. You’ll need to replace the burnt-out motor to bring your valve back in working order.
Powerhead Jam
Another common problem with motorized Honeywell mixing valves is a powerhead/actuator jam. In most cases, changing the powerhead resolves the problem. If it doesn’t, you’ll need to change the entire valve.
How Long Do Honeywell Mixing Valves Last?
How long Honeywell mixing valves last depends on the type of valve you have and how it is maintained. Generally, a mixing valve can last 15 to 20 years. But it can wear out way earlier if it’s not maintained properly.
You can use the following tips to maximize the lifespan of your mixing valve.
- If you live in an area that has a hard water problem, you should use a water-softening system to prevent mineral deposits and limescale buildup inside the fixture and mixing valve.
- If you have mixing valves in your house that aren’t used frequently, make sure that you flush them for several minutes at least once a week
- Get your mixing valves checked and serviced at least once a year by a professional and licensed plumber to make sure they continue to work optimally.
Additionally, you should also call a professional plumber immediately if you notice that your mixing valve isn’t working properly. The most common symptoms of a bad mixing valve include the following:
- Water feels too hot
- Constant fluctuation in water temperature
- Hot water from the cold side or vice versa
- Not hot/cold water at all
- Inconsistent water flow/pressure
- Unexplained health issues
- Dripping faucets or shower heads
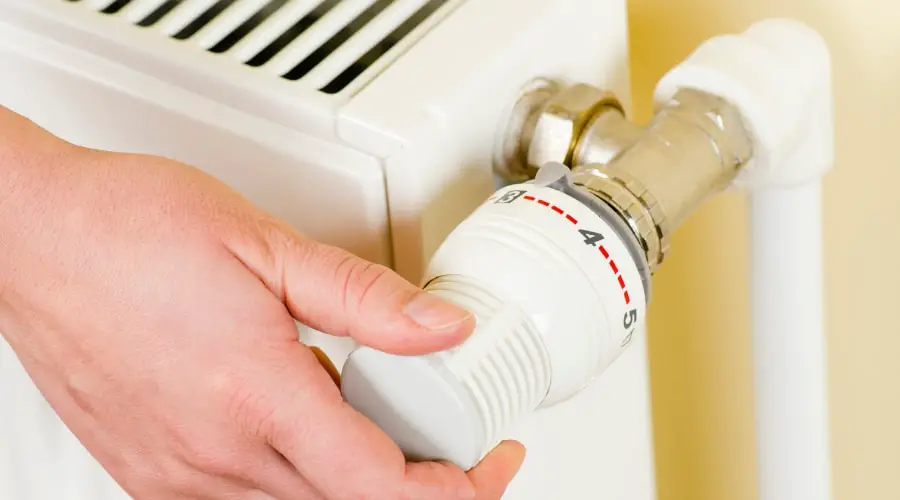
How Do You Adjust a Honeywell Mixing Valve?
The exact directions that you’ll need to follow in order to adjust the Honeywell mixing valve will vary from model to model. We have compiled the steps that you can follow to adjust AMX series DirectConnect and Proportional Honeywell mixing valves.
AMX series DirectConnect
- Remove the label (with temperature range readings) located on the mixing valve. It’ll allow you to access the temperature controls.
- Place the correct-sized Allen wrench into the adjustment screw.
- If you want to increase the temperature, you’ll need to turn the wrench counterclockwise and vice versa.
- Use a thermometer to test the water temperature coming out of a faucet or shower head.
- Readjust the mixing valve if needed.
Proportional
- Use a screwdriver to loosen the screw located on top of the Honeywell Proportional mixing valve. Make sure that you don’t remove the screw.
- Lift the hand wheel using your dominant hand gently.
- If you want to reduce the temperature, turn the hand wheel counterclockwise and vice versa.
- Press down the handle wheel and tighten the screw.
- Measure the temperature of hot water coming out of any faucet in your house.
- Readjust the temperature using the same technique if needed.
How Do You Clean a Honeywell Mixing Valve?
If you notice that the water flow or pressure has been reduced, there might be a clog in your mixing valve. You can use the following steps to clean your Honeywell mixing valve.
- Remove the mixing valve from its place using a wrench.
- Valve off the hot and cold inlets.
- Take apart the unions that connect the piping to the body of the mixing valve.
- Place all the parts in a big bowl filled with vinegar and water solution (equal parts). You can also use CLR or Lime-A-Way for the same purpose.
- Let the mixing valve parts sit in the solution for at least two hours.
- After that, use a brush with stiff nylon bristles to remove broken particles of mineral and limescale buildup.
- Rinse all the parts using fresh water to get rid of the cleaning solution’s residue.
- Install the mixing valve back in its place and that’s about it.
While cleaning your mixing valve, you won’t be able to use your faucets and taps, which can be a hassle. To counter this problem, we recommend you keep a spare mixing valve that you can install after removing the one that you need to clean.
Final Words
Honeywell manufactures long-lasting, reliable, and efficient mixing valves that you can use in your home. However, they can become faulty or deteriorated, just like any other product and you’ll need a replacement mixing valve to solve the problem.
Make sure that you follow maintenance tips and the cleaning process discussed above. It’ll allow you to maximize the lifespan of your Honeywell mixing valves and keep them in good condition.
A thermostatic mixing valve is a necessary gadget for the bathroom of your house. It will mix both hot water and cold water, and keep the temperature of that mixture suitable for you. When you take a bath with perfectly blended water, you will feel much fresh.
You can install it all by yourself when you know the processes of how does a thermostatic mixing valve works. When any repair is necessary, you can do it easily with your knowledge of this sector. If you take proper care of this machine, it will serve you long.