Last Updated on August 27, 2022 by admin
A sewage backlog is the last thing any landowner expects. Suppose your house has an underground bathroom or other drainage fittings that are below the primary sewer or sanitary lines. In that case, you’ll require a sewage pumping mechanism to push waste materials against gravity. Even the most incredible sewage ejector pump will ultimately need to be changed since it specializes in lifting particles and wastes up and out from the residence. This article will walk you through the installation process and briefly overview the sewage ejector pump venting diagram.
Table Of Contents
Installation Precautions
Firstly, review the user manual’s directions and cautions. This will aid you in the setup procedure. The owner’s handbook will also tell you which components (such as float switches and alarms) are interoperable with your sewage pumps.
Check local construction codes to ensure your ejector system meets the criteria. Finally, sewage ejector pumps are not similar to sump pumps, and they cannot be utilized alternately. The most significant distinction between sewage and sump pumps is that sump pumps cannot pump solid debris.
Installing a Sewage Ejector Pump
If you’ve taken out an old sewage pump, the first step you should do is glance over the vacant ejector hole for any evidence of corrosion to the bowl or anything else unusual. Clean any loose trash or objects adhering to the basin’s walls with caution. This is necessary to avoid smells and gas leaks.
Prior to inserting the pump in the sewage basin, the fresh check valve should be fitted. Discreet check valves are available that are nearly silent while in use, which is a valuable attribute for basement toilets. If you don’t wish to struggle with backflow later, now is the opportunity to put a ball valve over and as near to the check valve as feasible. This step is voluntary, but it will make subsequent servicing a lot easier.
To examine the new ejector pump, connect it to a designated circuit. Start the pump by activating the float switch. Leave the pump flowing only long enough to detect it; a sewage pump should never be left without water, or it will be destroyed. To guarantee the proper functioning, ensure the float switch is placed at the perfect level for the pump.
Applying the primer and PVC adhesive, connect the male-threaded connector to one end of the PVC tube. Fasten the adapter-end of the PVC tube onto the sewage ejector pump with a wrench once it has been joined. If the fittings are overtightened, they may break.
Creating a weep hole is perhaps one of the most critical stages because it prevents an air-lock in the pipe from causing the pump to dry up. Without a weep opening, water beneath a check valve travels back into the hole, compressing any remaining air in the tube, perhaps preventing water from exiting the pump the following time it attempts to clear the basin.
If you’re changing the lower discharge tube, you’ll need to take measurements of the old outlet tube and factor in that the ultimate length with the new check valve placed may be somewhat varied. Slice the tube on a raised platform using a chainsaw, then level off the ends with a safety blade as a sharpening tool.
Descend both into the sewage basin through the pump lever, with the outlet tube correctly cut and securely fastened to the sewage pump. Employ zip ties to hold the power cable over the float and protect it from grabbing anyplace in the basin after it’s within the basin and you’re confident the PVC tube is the perfect length.
Utilizing the same primer and PVC adhesive process, connect the coupler to the head of the sliced PVC tube. Push the adapter for the base of the check valve onto the coupler before joining it to the outlet tube prior to joining it to the check valve.
The outlet tube and check valve should then be aligned, and the cemented coupler should be attached to the tube. Push the connector up and hand-tighten the threads on the upper and lower check valves. Overtightening the fittings might cause them to fracture.
As soon as the pump is securely positioned inside the basin, check that the float switch may easily travel around the basin. Next, utilizing a bucket, load the basin with sufficient water such that the increasing level of water flips the float switch, ensuring the pump is correctly operational.
Assemble the fresh gasket and ensure it’s ready to go on the lid. To slip the covering over the outlet tube, it must be free before placing it. Before sealing the basin cover, verify that all electric cables have been drawn through the openings.
The vent pipe should be approximately 2 or 3 inches within the bowl underneath the cover whenever the cover is in position. To firmly fix the basin cover, run a droplet of silicone all the way round the edges of the aperture. Seal the outlet tube with the covering and gently press it tightly. Insert and tighten the nuts and screws that secure the lid in position.
To keep the nuts from wearing out in the long term, use anti-seize lubrication. After that, zip tie whatever residual wire gap over the cap to the outlet tube. To avoid water from going through the cable and entering the outlet, ensure the tops of the wires remain underneath the level of the electric socket. Lastly, slide the donut gasket onto the outlet tube and secure it in place with the notches.
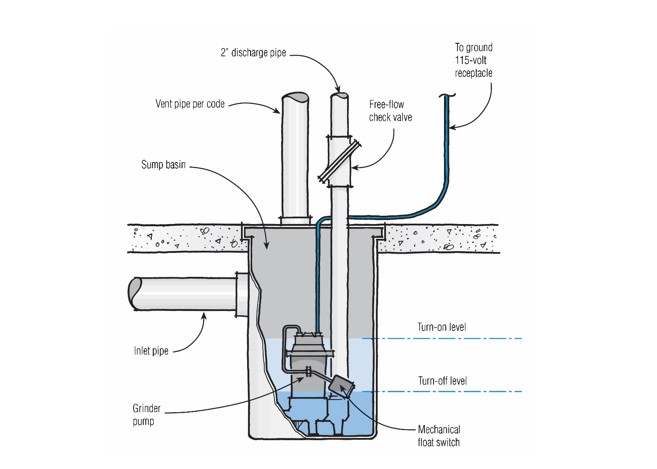
Below is a schematic of the venting process:
How To Install A Sewer Ejector System
Conclusion
You do not have to bother over it for a long time now that you’ve correctly built your sewage pump. Sewage pump venting difficulties may lead to a slew of complications at home, as well as unneeded turbulence. Knowing how to install it and having a basic understanding of the sewage ejector pump venting diagram would be quite beneficial.